I used to use this method when I made M.U.G.E.N characters. If done correctly , you will end up with the same offset for every frame of the character you rip. This is actually my first attempt at writing a "proper" tutorial so let me know if anything isn't clear and I'll update it accordingly.
For this tutorial , I recommend using WinKawaks and Jasc Animation shop 3.
Open WinKawaks. Before we load the game , there are a few things we need to check. Make sure you are not using any blending or scanlines etc. by checking the following options..
Video/Interframe blending/noneVideo/Select video blitter/normalThose options will ensure that the sprites we rip will be "clean" and not blurry. Also , while we are in the video options , set the background colour to pink. It will save us some time later.
Video/Set background color/pinkNext , we will set up the NeoGeo settings. I prefer to rip my sprites in practice mode as it gives me unlimited time. Set it by checking..
Game/NeoGeo settings/ConsoleNow , start up your game and go into practice mode. Select player 1 as the character you want to rip. In the tutorial , I am using Iori. It doesn't matter who you choose as player 2.
Once the round has started, click on
Game/NeoGeo settings/Debug dipswitchesA new window will pop up with a series of check boxes. Check boxes 1-1 1-3 and 1-6 like so

Press OK and you should now see 3 characters on screen. Don't worry if the colours are messed up. The "debug object" adopts player 1's palette , which is why you must select the character you want to rip as player 1.
To gain control over the debug object , you need to hold in player 1 select (F3 by default). You will notice that this will pause the game so the best thing to do is press and release F3 to pause it then press and hold F3 to control the debug object.
While holding select use the following commands
1p left/up/down/right moves the default object ( I recommend putting the object in the middle of the screen facing right)
1p A and 1p B changes the characters animation (I.E. from idle to walking etc)
1p C and 1p D changes the character (I.E from Kyo to Iori etc)
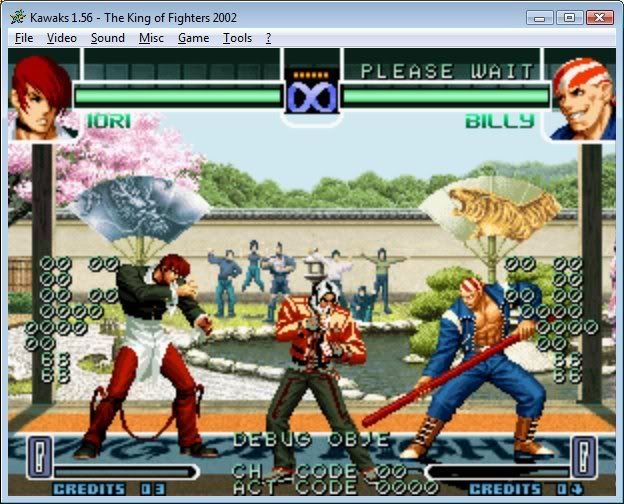
Your screen should look something like this when you are done setting the character and position..

Save the game now with WinKawaks savestate feature (F5 to save , F7 to load) so that you can easily resume ripping if you need to quit for any reason.
MAKE SURE YOU DO NOT MOVE THE DEBUG OBJECT FROM THIS POINT ON AS IT WILL NOW EFFECT THE OFFSETNow , open the shot factory found in the tools tab
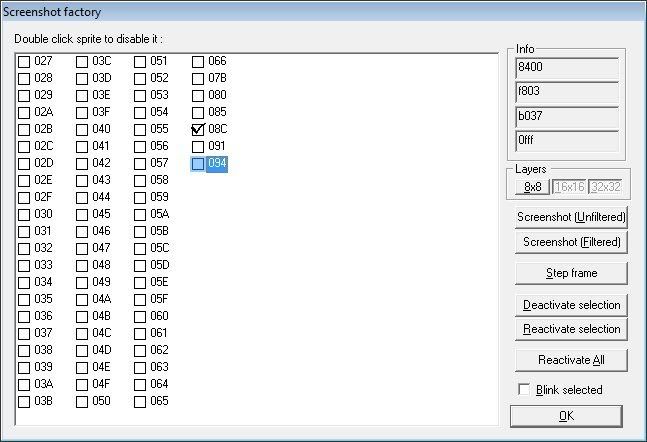
Disable the lifebars by clicking the 8x8 button and uncheck all the boxes on the left until you are left with the one that corresponds to the debug object you are ripping. Press OK to close the factory. You should be seeing something like this...
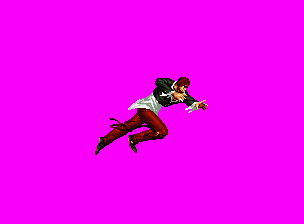
Sometimes , certain sprites may reappear , just open the shot factory and disable those sprites again.
Now to rip the sprites, set the animation you need and pause WinKawaks with the ENTER button. To take a screenshot , press Ctrl+p. You then step the frames by pressing Shift+SPACEBAR. Once you see the frame change , take another screenshot (Ctrl+p)
Repeat the process until you have ALL your required sprites. Most games display effects (fireballs,sparks etc) seperately so it might be an idea to rip the character first then go back and do the effects later and "rebuild" them.
Now that we have all our sprites , open Jasc Animation shop 3 and open the "animation wizard" making sure to check the option "same size as the first image frame" Choose your frames by browsing the animation wizard to WinKawaks/capture folder. To ensure they are all selected and appear in the correct order , left click the mouse on the last screenshot then hold shift while left clicking on the first screenshot.
Press "Next" then "Finish" on the wizard and Animation shop will build the screenshots into an animation. Use the crop tool to reduce the size of the frames. Animation shop displays the crop box on every frame of the animation so you can check every frame to make sure you are not cutting any parts of the frames. Once you are satisfied , click the crop button and save your frames by pressing Ctrl+A to highlight all the frames then selecting FILE/Save Frames As. I also find it useful to save using the "DOS 8.3" and "append leading zeros" settings ( this will make sure your filenames are never longer than 8 characters and are numbered correctly)
I always cut the animation into the characters separate anims at this point and save them induvidually to save confusion at a later point.
All being well , you should have a character completely ripped with every single frame using the same single offset point.


 Guests: 7
 Hidden: 0
 Users: 0